HERE IS A REVOLUTIONARY NEW STENCIL MAKING IDEA!
How to Make Custom Stencils
Now You Can Make Your Own Stencils with Your Own Artwork or Designs In Minutes using your computer and the New Stencil Makers.
Each Stencil Will Make Hundreds Of Marks On Glass, Metal, Wood, Fabric, Paper, Plastic, Signs, Cardboard, Marble, Ceramics Or Hundreds Of Other Items. Best Of All, You Can Use Your Stencil Over And Over And Go From One Project To Another. You Can Use Paint, Glass Etching Cream, Metal Etching Electrolyte and Even Ink To Print, Paint, or Etch On Almost Anything!
This is NEW and there is Nothing Like It Available Anywhere on the Net. You can be First to Explore All the many different ideas these Stencils are capable of creating.
Use them for Your Craft or Hobby Projects or in Your Business or even START A NEW BUSINESS with these easy to make, Premium Quality Stencils! There are so many Thousands of ways You can use YOUR Ideas and these Revolutionary New UNIVERSAL STENCILS that we can't show them all here.
So, What are these NEW Universal Stencils?
These are Stencils that YOU make using YOUR own Computer and Your Own Ideas, Copy, Artwork, Trademark, Logos or Drawings (Even Intricate and Complicated Ones) in Your own Shop, Home or Office in Just Minutes.
They are Permanent and are Reusable Hundreds of times. You can make stencils that were "Never Before Possible" with great detail and you can let your Creative Talent run Wild and do hundreds of projects that were way too complicated before but now are very easy.
Best of all, since the stencils are Reusable hundreds of times, they are Very Inexpensive and you can etch, paint and mark on almost anything for less than a penny per mark and You can Save your stencils between projects.
What can you do with these Stencils?
Here is a quick glance at what you can do with these stencils. First of all you can now make extremely Complicated Stencils in just minutes.
Can You even Imagine how difficult it would be to make the stencil below the old way of "Cutting Out Vinyl" with an Exacto Knife or Razor Blade and it would only be good for One Use?
This is So Much Easier, Cheaper and Faster and the results are superior to anything that can be "Cut Out".
Unlimited Uses for Your Custom Stencils
Now you are beginning to really get the Idea...these stencils have Unlimited uses and You will have Fun simply Exploring all of the different ways you can use them.
So now take just a Minute and read below and see how very easy it is to make one of these New Universal Stencils. Once you see how Fast and Easy it is to make these Stencils then "Let Yourself Go".
Step 1 - Make your Copy, Design or Artwork
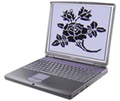 |
No Special Software Needed!
Create your Copy, Designs, or Artwork on Your computer using almost any software that you already have. |
Step 2 - Print Out Your Transparency
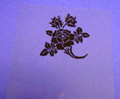 |
Print the design in Black Ink onto a transparency which comes in each kit.
Be Sure that it prints out as Black as possible so you will have an excellent stencil created. |
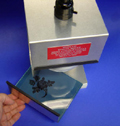
Step 3 - Here is the New Mark 440 Stencil Maker
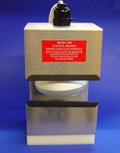 |
Here is one of the Three New Stencil Makers.
Note: We have different sizes so you can make stencils from 4"x 4" up to large stencils 10"x 12".
To get your Stencil Maker ready to go simply plug it into any electrical outlet and remove the tray with the glass and black rubber pad so that you can "Load" it with your Undeveloped Stencil and your printed
Transparency. |
Step 4 - Stencil On Top Of The Transparency
 |
Simply lay the transparency on the stencil and place the glass on TOP OF THE TRANSPARENCY. This is to hold the copy in place during exposure.
Note: You can place the transparency copy either right side up or upside down. The stencils DO NOT have a top or bottom at this point. |
Step 5 - Expose the Stencil for 2-3 Minutes
 |
Now slide this tray with your Transparency, and your Unexposed stencil covered with a glass plate (to keep the stencil and copy from moving during exposure) into the exposure unit as shown at left.
Turn on the unit, set the timer (comes in kit) and expose the stencil for 2 to 3 minutes. |
Step 6 - Peel Back Mylar Backing (Both Sides)
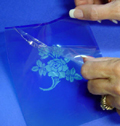 |
After the short exposure simply remove the tray, and take out the exposed stencil.
The stencil has a thin clear Mylar covering on BOTH SIDES. You'll need to remove both pieces in order for the developer to work. Simply separate the clear backing from the blue stencil at a corner and peel it apart. |
Step 7 - Develop Stencil for 2-3 Minutes
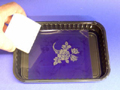 |
Place the stencil in a pan of developer provided in the kit. Use a sponge to gently wipe away the unexposed parts of the stencil. This will be the part that will etch. |
As the stencil develops, you will see the light parts getting even lighter, and you will be able to feel the light parts get slightly rough.
When all of your design feels rough and looks evenly light, take the stencil out of the developer. Once the stencil is completely developed, wash all of the developer fluid off of the stencil under running water. Use a paper towel to blot dry the stencil. |
Step 8 - Dry Your Stencil Completely
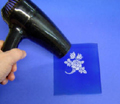 |
To make sure that the stencil is completely dry, use a blow-dryer to dry the stencil on both sides. This makes the stencil easier to handle.
The Stencil is now ready for Ink, Paint, Metal Etching Electrolyte or even Glass Etching Cream. |
Note: when you are finished with the stencil you should clean it up with water and DRY IT AGAIN FOR STORAGE. You can use it many times if you take care of it and keep it DRY.
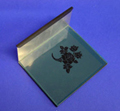
Step 9 - Finished Stencil - Ready to Use!
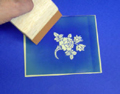 |
Now that your stencil is dry it is ready for printing, painting or etching.
If you are painting simply select your Substrate (Technical name for anything you want to paint on) and place the stencil in position. |
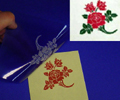
Finished Stencil - Apply Ink to Squeegee
 |
If you are going to paint you will need to use a Squeegee. Select your paint and then put a small amount of your desired paint on the squeegee as shown. |
A little bit of paint or ink goes a long way, but you need to be sure that you use enough to "fill" the stencil. One or two strokes on your stencil and you will be able to easily determine the right amount of paint to use.
Position Your Squeegee As Shown
 |
Position your paint covered squeegee on the stencil.
Now PULL the Squeegee firmly across the stencil in ONE SMOOTH STROKE using light to medium hand pressure. |
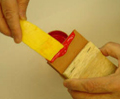
Quickly Lift Up The Stencil From One End
 |
Now hold the stencil on one edge so it will not move and quickly Lift Up the stencil from one end so as not to "Smear" the ink or paint on your substrate.
Here's what your artwork will look like when it's done. This is indeed "One Stroke" painting. |
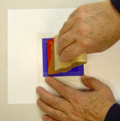
Also you can make your print in different colors by "Blocking Off" parts of your stencil with "Non Stick Tape" to keep the different colored paints from printing as you complete your multi-colored print as shown here (inset picture).
Open Up a World of Possibilites
There you have it...A New Stencil Making System that will open up a world of Great New Possibilities for you and allow you to use Your Talent and Ideas to have a lot of Fun and make some real Money.
You are only limited by your own Imagination and Energy. So now is the time to let your Artistic Ideas flow and enjoy creating things you have put off before as too much work....especially if the artwork had to be repeated over and over again or was quite complicated.
This new system cuts through all of that and Frees You up to "Multiply" yourself if you are creating any item or artwork that needs to be "Produced" in almost any amount.
Now You Can Make Stencils With YOUR Copy, Artwork Or Designs In Minutes For Pennies and EACH STENCIL Can Be Used To Etch, Paint Or Print On Glass, Metal, Wood, Fabric, Paper or Almost Anything!

Complicated Stencil Above

Paint with Your Stencil
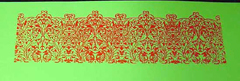
Finished Border Stencil
---------------------------------------------------------------
Or You can make a Simple Stencil And Mark anything "In Between" such as:

Custom Etched Glasses

Paint on Glass Candle Holder

Etched Glass Ornaments

Paint on Fabric

Ink on Scrap Book Page

Custom Etched Tools

Ink on Quilt Squares

Painted Wood Sign
---------------------------------------------------------------
Interested in Becoming an Affiliate?
---------------------------------------------------------------
Martronics can help you make art stencils, craft
stencils, custom stencils, paint stencils and design stencils.
----------------------------------------------------------------
Limited Time Offer
Stencil Maker Kits
Be Sure And Take Advantage of the Special Low Prices on these New Kits during this Limited Time Offer. Simply decide on the actual Size of the Stencil you may want to use....such as 5"x 6" or 6"x 8" or 10"x 12" and let that help you decide on the kit you will find the most Economical for You.
----------------------------------------------------------------
Craft & Paint Testimonials
Dear Martronics,
The only other time I have ever written a company was to complain
about a very shoddy product. So this time I'm writing to tell you
how really pleased I am with the new stencil making kit. I am
finding a new use for it almost every time I use it and it is sure fast
when you want to put the same design on a lot of fabric at the same
time. In fact it works so well that I have even "conned" my
husband into helping me. He thinks it is fun but he is a little
messy with the paint.
Sincerely
yours,
Hilda Ronson,
Denver, Colorado
----------------------------------------------------------------
Hi Martronics:
Just wanted to let you know that we used one of your fancy new
stencils and applied Military Letters and Numbering to an U.S. Army
Abrams M-1 Tank using EPOXY Paint. We know the stencils are NOT
designed for that type of paint but it worked Great and saved us a lot
of time and hassle. The Army even liked it.
Thanks,
George O'Brien, Boston, MA
----------------------------------------------------------------
Martronics Corp.
I appreciate your help using the Etch-O-Matic to mark my Chef tools
(knives). It
cut my losses to zero. Since the cost of my knives was in excess of
$2,000.00, the kit was well worth the money.
Sincerely,
Philip Pickering,
Whitefish, Mt
----------------------------------------------------------------
Dear Sirs:
I thought you might want to know that we had to etch an inspection mark
in the nose cone of the Space Shuttle. I told them about your little
Etch-O-Matic and we tried it. It worked great.
Thanks, Don McKay, Florida
----------------------------------------------------------------
Dear Martronics:
Here is another order for a 10 package of 5"x 6" stencils. They are
working better than I expected in getting permanent marks on our tools.
Now we only lose half as many as before. Oh well, at least we have cut
down the loss more than enough to pay for the kit about ten times over
and the rate of loss is also still falling. Maybe we will eventually get
it stopped completely.
Best regards,
Jose Martinez
Miami, FL
----------------------------------------------------------------
Martronics
Corporation
PO BOX 200/500 Wilcox RD, Salkum, WA 98582
Ph:800-775-0797
Fax:360-985-2996
Email
